Replicate

Replicate
Is it possible to Replicate my model into a matrix or circle?
Yes!
The awesome power of Replicate will have you dreaming in no time.
Take any simple object and create instant, intricate circular geometry using the Ring tool.
Or, build a mind boggling matrix scaffolding out of unique shapes of your choosing using Array!

Array
How do I Replicate my model into a 1D, 2D, or 3D matrix?
The Array button lets you choose how many objects to copy, and the Distance between them.- This tool works on both meshes and volumes, so even if you have errors in your mesh, you can still play with Array!
Distance
- You can choose the Distance separately for each axis.
- If your objects end up stacked too close to one another, click Undo from the Edit menu, and increase the Distance next time.
Number
- You can choose the Number of copies separately for each axis.
- Note that if you choose high Numbers of objects to Replicate, it depends on your computer specs how long that will take to process.
- If it is taking too long, try a smaller Number!
- And check out our System Requirements.
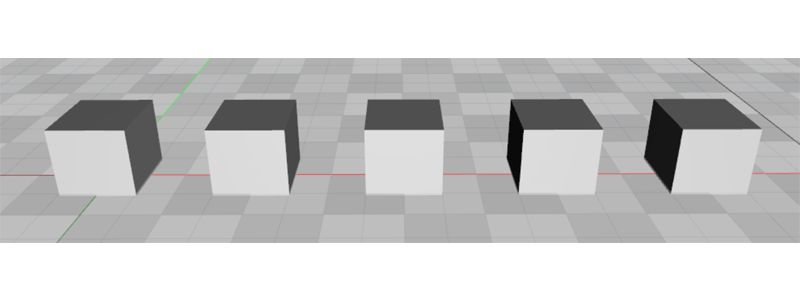
1D Array
How do I Replicate my model into a 1D row or column?
It's easy to make a 1D Array!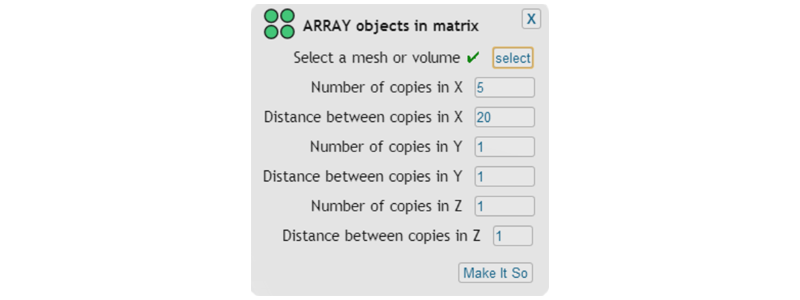
1D Array Settings
What are the options for creating a 1D row or column?
The picture of a 1D row of cubes in the previous slide has the settings pictured above, as an example.
See below for a per-axis description of how to create a 1D row or column.
X Axis- To make a straight line of objects in a row along the X axis, set the Number of copies in Y & Z to only 1.
- And set the Number of copies in X to the total objects you want in the row.
Y Axis
- To make a straight line of objects in the depth of field along the Y axis, set the Number of copies in X & Z to only 1.
- And set the Number of copies in Y to the total objects you want extending into the depth of field.
Z Axis
- To make a straight line of objects in a vertical column along the Z axis, set the Number of copies in X & Y to only 1.
- And set the Number of copies in Z to the total objects you want in the vertical column.
2D Array
How do I Replicate my model into a 2D matrix?
It's easy to make a 2D Array!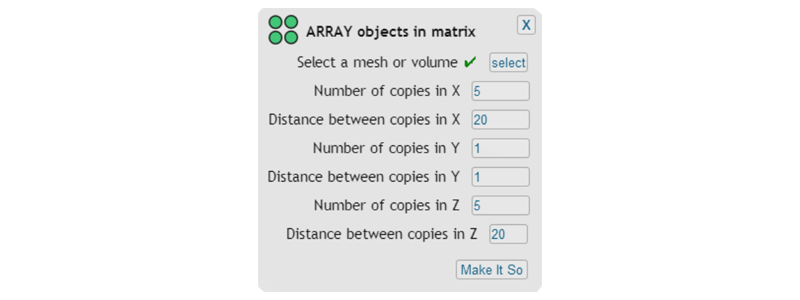
2D Array Settings
What are the options for creating a 2D matrix?
The picture of a 2D vertical plane of cubes in the previous slide has the settings pictured above, as an example.
See below for a per-axis description of how to create a 2D matrix in a plane.
X & Y Axes- To make a horizontal plane of objects along the X & Y axes, increase the Number of copies in X & Y to above 1.
- And keep the Z Number set to only 1.
X & Z Axes
- To make a vertical plane of objects in a row along the X & Z axes, increase the Number of copies in X & Z to above 1.
- And keep the Y Number set to only 1.
Y & Z Axes
- To make a vertical plane of objects extending into the depth of field along the Y & Z axes, increase the Number of copies in Y & Z to above 1.
- And keep the X Number set to only 1.
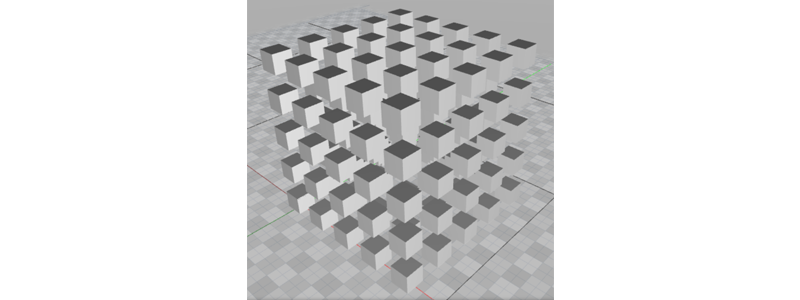
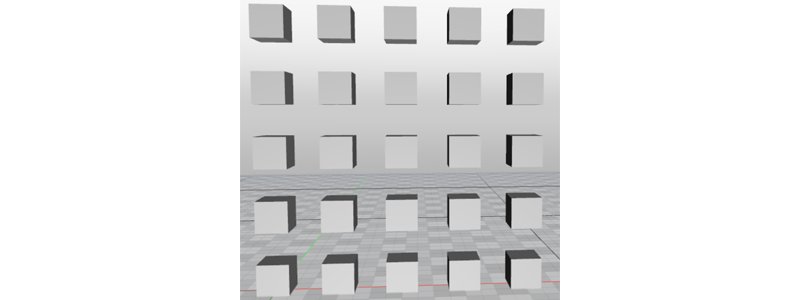
3D Array
How do I Replicate my model into a 3D matrix?
It is easy to make a 3D Array!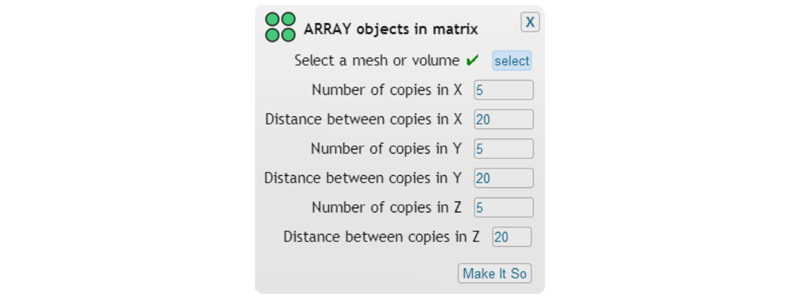
3D Array Settings
What are the options for creating a 3D matrix?
The picture of a 3D matrix of cubes in the previous slide has the settings pictured above, as an example.
See below for a description of how to create a 3D matrix.
X, Y, & Z Axes- To make a 3D matrix of objects along the X, Y, & Z axes, increase the Number of copies in X, Y, & Z to above 1.
Math 101
- Remember that with a 3D matrix, the Number in each axis is multiplied together to make the total Number of objects.
- So for example, there are 1,000 objects in a 10 x 10 x 10 matrix!
- Simply choose smaller Numbers if your computer is thinking too long.
- And check out our System Requirements.

Ring
How do I Replicate my model into a circle?
Dream up completely new shapes of unexpected beauty with the Ring tool!
This is one of the coolest, prettiest toys to come to the 3D world. Ring can make an object as simple as a cube into intricate gears and stars.
Just imagine what astonishing models you can create by using a more detailed object as a base!- This tool works on both meshes and volumes, so even if you have errors in your mesh, you can still play with Ring!
Distance
- If your objects end up stacked too close to one another, click Undo from the Edit menu, and increase the Distance from the Center Point next time.
Number
- Note that if you choose high Numbers of objects to Replicate, it depends on your computer specs how long that will take to process.
- If it is taking too long, try a smaller Number!
- And check out our System Requirements.
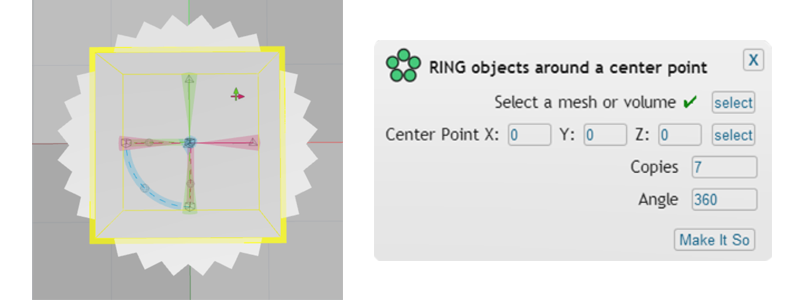
Ring Settings
What are the options for creating a Ring?
The Ring of 7 cubes above has its settings pictured as an example.
As you can see, with such a simple base object, the possibilities are limitless when you apply your imagination and creativity using the Ring tool!
Center Point- The Center Point is by default relative to the center of the grid.
- To choose another Center Point, simply click anywhere in the scene and you will see the X, Y and Z values automatically populate into their respective fields. Alternatively, you can also type in values directly yourself.
Number of Copies
- Pick the Number of objects you want in the Ring.
- Remember, if it is taking too long, try a smaller Number!
Angle
- Choose how many degrees in the circle you want Ring to Replicate.
- Keep the default set to 360 for a full circle.
- 180 will fit all copies into one half of a circle, and 90 will fit all copies into one quarter of a circle.
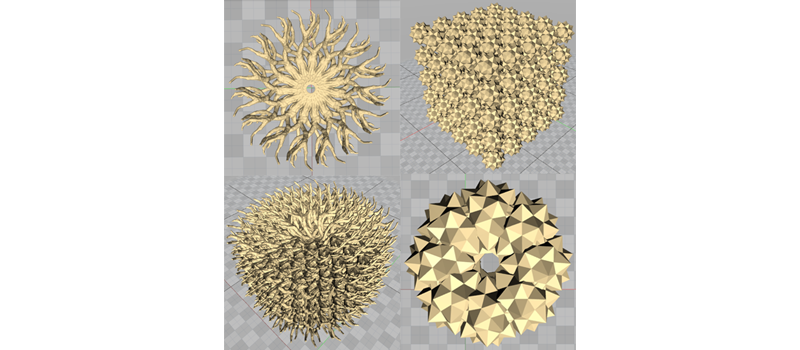
Infinite Possibilities
What can you imagine?
The objects pictured above were made with our Tree Trunk and Stellated Icosahedron, available in our Library.
Mix and match your imagination to your heart's content with this awesome and powerful tool.
- What is your favorite shape?
- Your favorite number?
- Do you find geometry beautiful? How about the organic flowing curves of nature?
- What new intricate and unique shapes can you invent?
- Try out our Get Started Quickly hands on tour of MeshUP to learn to use Ring along with other tools.