Repair Meshes
Overview
How do I fix errors with my mesh?
MeshUP offers a suite of mesh repair tools which prepare your models to be converted into one of our volume types so you can take advantage of our Volume modeling tools, and Export as error free and watertight.
Also check out our Guide section on Mesh Repair tools for more information.
You can skip repair altogether!
- Remember if at any point you are not getting the options or results you want, you can always bypass mesh repair all together by converting the mesh to an Envelope, which requires no repair, even with thousands of defects!
Step 2 - Select
How do I select the object to see the defects?
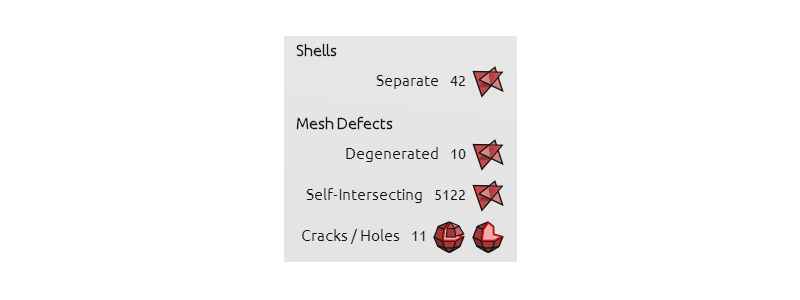
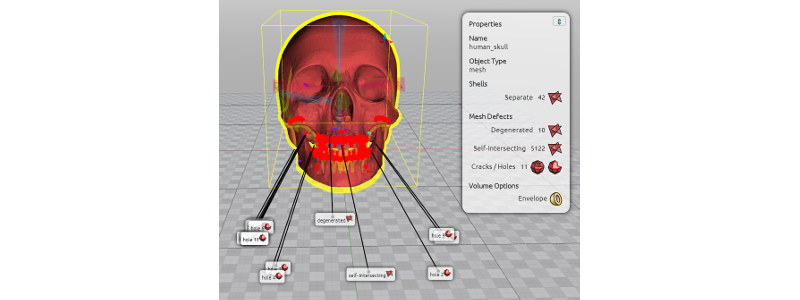
Select the skull by left clicking, and notice that the types of errors are displayed in 2 ways:- In the Properties window, listed by type and number.
- As tags attached to the model.
In the Properties window also note the Volume Options section which lists the types of volumes you can convert the current mesh to.
If there are more than a few hundred total defects, depending on your computer the mesh repair process can take several minutes to complete. In this case, consider converting the mesh to an Envelope volume type, which will materialize a volume from any mesh, even one with thousands of unfixed defects.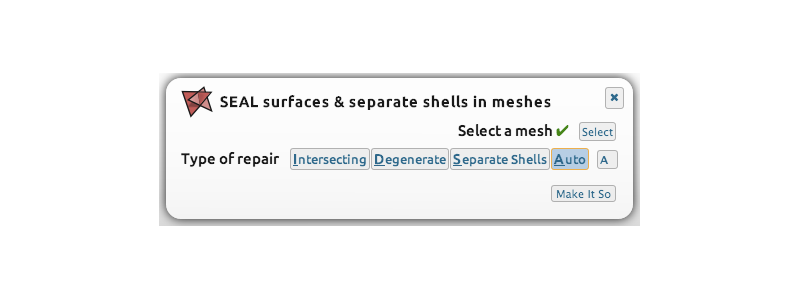
Step 3 - Auto Repair
What is the fastest way to repair my mesh?
The simplest way to fix models is with our Auto Repair.- Click on the icon next to the word Separate or Intersecting in the Properties window.
- Click on the Auto button in the window that launches.
- Click Make It So.
It will take a few minutes for mesh repair to complete so watch the progress bar in the lower right.
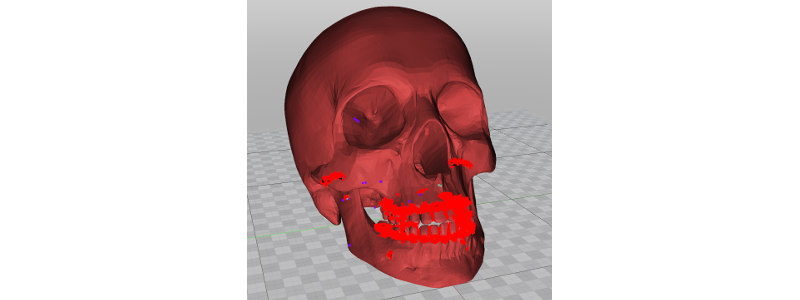
After mesh repair has finished, if the object is grey, then all the errors have been fixed. If the object is pink, then there is at least one hole or crack. If the object is red, then there are intersections and/or degenerates.
If the object is pink or red, click on the object and use the Properties menu to see what errors persist. Try fixing them by clicking on the icons next to the error type. Keep in mind there are a few cases where we can not fix all errors.
Remember, if you are ever unable to repair the last holes, you can always use Shell on pink meshes, or Envelope on red meshes, through our UP tool.
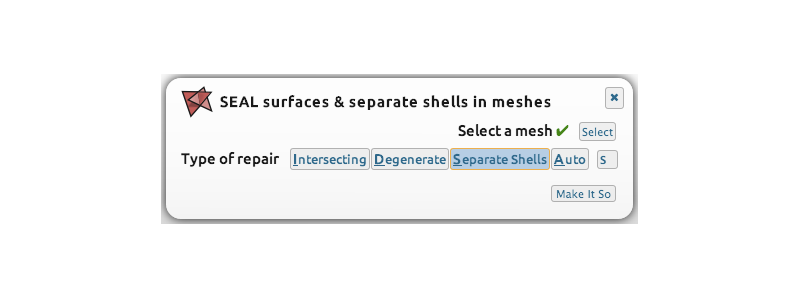
Step 4 - Separate Shells
The other option for repairing meshes is to fix the errors one type at a time.
Start with Separate Shells. Intersecting defects can often be a result of multiple shells, so by creating separate meshes, you might be able to resolve these errors right away.
You can always join the shells back together later, so don't worry if they are all part of one object.- Click on the icon next to the word Separate under Shells in the Properties window.
- The Seal surfaces window launches with that option preloaded.
- Click Make It So.

Step 5 - Intersecting Defects
I separated my shells, but I still have Intersecting defects!
After using Separate Shells, if you still have errors, start by fixing Intersecting defects.
The skull model is now separated into many shells, so we will apply the repair process to each shell that has errors.- Start by selecting the top part of the skull.
- Click on the icon next to the word Intersecting under Mesh Defects in the Properties window, or the icon next to the self-intersecting tag hovering over the model.
- The Seal surfaces window launches with that option preloaded.
- Click Make It So.
Remember, depending on your computer and the number of errors, it can take a several minutes for the Seal command to finish. See the progress bar in the lower right for status, and see our System Requirements.

Step 6 - Rinse & Repeat
I ran repair on Intersecting defects, but there are still errors!
Depending on how many defects there are, you will want to run mesh repair tools multiple times to make all the fixes you want.- Select the top part of the skull. Notice that the last repair created multiple shells within one object to resolve the Intersecting defects.
- Continue to use Separate Shells if there are multiple Shells showing in the Properties window.
- Then fix Intersecting defects.
- Next fix Degenerate defects.
- Rinse & repeat until only Cracks / Holes are left, or until the number of errors does not decrease anymore.
Select the other shells of the skull and perform the same process as described above.
Step 7 - Hole Repair
I fixed the other defects, how do I repair cracks & holes?
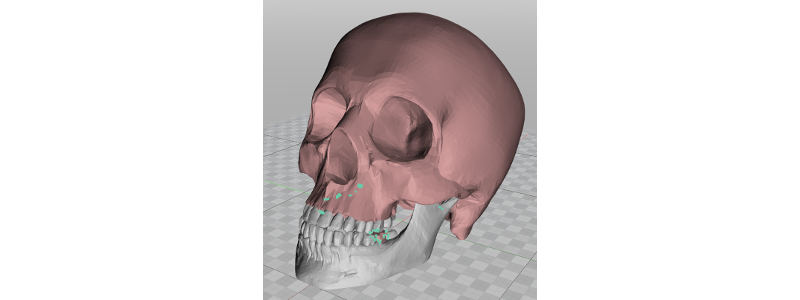
The skull shells are now grey or pink. Grey means no more defects. Pink means all defects are fixed except Cracks / Holes. The hole itself is outlined in turquoise.
Seam Cracks
If you fix cracks before holes, this will often resolve most of the tiny cracks in one go.- Select a pink shell.
- Click on the left red icon next to Cracks / Holes in the Properties window, under Mesh Defects.
- The Seam Cracks window launches, click Make It So.
Patch Holes
If there are still holes after running Seam Cracks, then try Patch Holes.- Click the red icon for Patch Holes under Cracks / Holes in the Properties window, under Mesh Defects, on the right.
- Leave the default settings as is, and click Make It So.
Rinse & Repeat
Repeat running Seam Cracks &Patch Holes as many times as needed for each pink shell. The shell will turn grey when there are no more holes or defects.
Remember, if you are ever unable to repair the last holes, you can always use Shell on pink meshes, or Envelope on red meshes, through our UP tool.

Step 8 - Volume
How do I volumize the parts I want to keep?
Very small extraneous shells can be left over after repairing Intersecting defects and using Separate Shells. These extra shells can be seen in the skull example by the turquoise outlines. These shells have Holes, so you can either:- Or, if the leftover shell pieces are not necessary, select all the parts of the skull you want to keep, then select the Invert Select tool from the Edit menu. Now you can Delete these extraneous parts.
All the parts of the skull example are grey, which means it can be converted into any volume type using the UP tool.
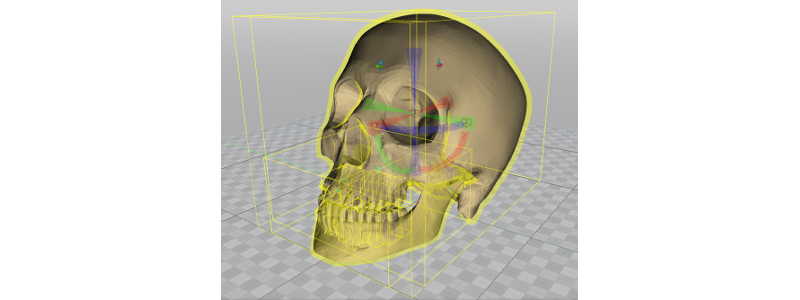
- Use A or the Select All tool from the Edit menu to select all the parts of the skull.
- Click on the UP icon next to the word Volume in the Properties window, under Volume Options.
- The UP dialogue launches with the selected option preloaded.
- Click Make It So.
- You now have a volumetric model, which will be bronze instead of grey.
- If any of parts the skull were missed in the selection, they will still be grey. Select any remaining pieces and convert them to Volumes.
Step 9 - Join
How do I merge all the volumized shells back together into one object?
- Use A or the Select All tool from the Edit menu to select all the parts of the skull.
- Click Join from the Volume menu.
- Click Make It So.
- If Make It So is disabled, that means there is at least one item in the selection which is not converted to some type of Volume. This is likely a very small extraneous shell. Try to re select all the parts of the skull with either Alt + Left Click + Drag or with Shift + Left Click.