Create Your Own Dice
Hands On Tutorial - How to Make Your Own Dice
The Geometric Bead was cool, can we learn to use some more advanced tools?
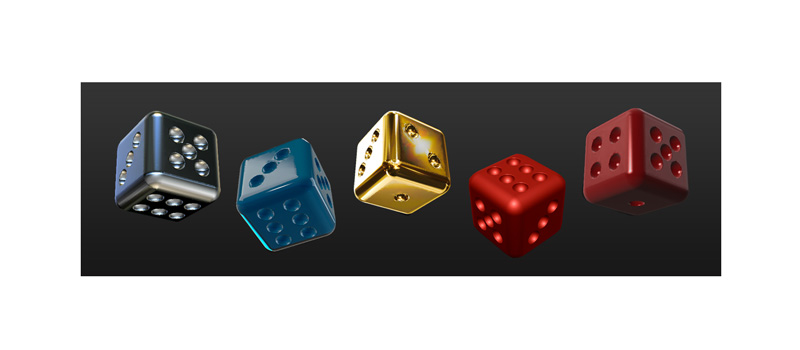
Absolutely! This tutorial will teach you how to make your own dice ready for 3D printing, while learning new skills. In the next slides, we will walk through each step together, and create the dice pictured above.
This tutorial teaches basic functionality in MeshUP, as well as more advanced tools like Gimbal Settings, Precise & Snap Gimbal Operations, Envelope Volume, Replicate, Subtract, World Coordinates, and Orthographic View.
For a simpler introduction, please see our Get Started Quickly tutorial on making your own 3D printable geometric bead.
Step 1 - Gimbal Settings
How do I set up the Gimbal?- Click on the Open Library button from the File menu in the top left toolbar.
- The Geometry category is selected by default. If you had another category selected, click on Geometry.
- Click on the Sphere on the top left. The object will load in the scene.
- Click on the object in the scene to select it. You will see the red / blue / green Gimbal appear.
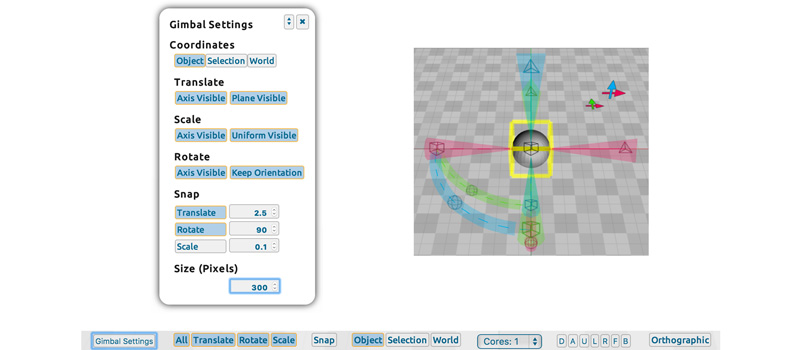
- Click on the Gimbal Settings button in the bottom left toolbar.
- The bottom setting is Size (Pixels). This refers to the size of the Gimbal. Increase the size to 300. This helps when performing a lot of operations on an object, because you can easily see each Gimbal tool.
- The Snap setting immediately above Size (Pixels) allows you to operate on the object in specified increments. This means you can move it by 10 units or rotate it by 90 degrees at a time.
- Click the Translate button to activate Snap for moving the object. Input a setting of 2.5 in the box. The object will now move in increments of 2.5 units.
- Click the Rotate button to activate Snap for rotating the object. Input a setting of 90 in the box. The object will now rotate in increments of 90 degrees.
- Close the Gimbal Settings by clicking on the X in the right hand corner.
- In the bottom toolbar, between Scale and Object, turn on Snap by clicking the button once, which will turn it blue instead of light grey.
Step 2 - Snap & Precise Operations
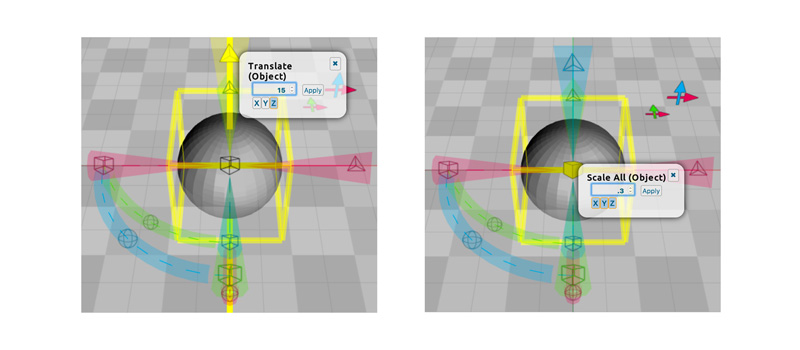
How do I use Snap and Precise Gimbal operations?- Do not move the object yet, as it is in a specific position. We will try two ways to move the object 15 units up along the Z axis.
- Snap settings are automatically applied when you left-click-drag the Gimbal arms to move the object.
- Precise operations are accessible by right-clicking the Gimbal arm, and entering a specific value. This does not apply the Snap increment.
- To see how your Snap setting of 2.5 units works, left-click-drag the Z axis Gimbal Translate arm ( blue triangle ) up 6 steps. This will be the equivalent of 15 units, because 6 x 2.5 = 15.
- Click the Undo button in the Edit menu in the top right toolbar.
- Now try Precise as an alternate option by right-clicking the Z axis Gimbal Translate arm ( blue triangle ). Enter the Precise value of 15, and click Apply. You can see that Snap is not applied to Precise operations.
- Now let’s prepare the sphere to be the right size for subtracting holes in the dice. Right-click the black cube in the center of the sphere, enter a Precise value of .3, and click Apply.
- Your sphere will now be smaller and moved up along the Z axis, ready for the next step!
Step 3 - UP Volume & Envelope
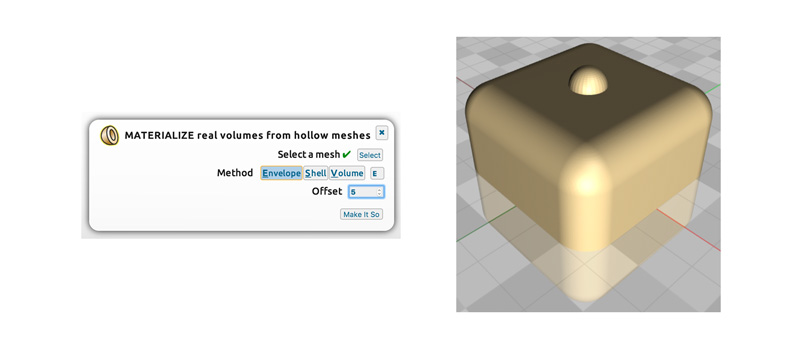
How do I use the options in the UP menu?- The UP button offers several options for volumization.
- Envelope is hollow, and can morph the shape of the object by changing the offset value. Volume is a solid object, and preserves the exact geometry of the outside and internals of the object. Shell is in between.
- If the sphere is not still selected, left-click it to select the object.
- Click the UP button in the toolbar, between Mesh and Volume.
- Leave Volume V as the default selection, and click the Make It So button.
- Now your grey mesh sphere will materialize into a solid bronze volume that can be used to subtract with.
- Next, click on the Open Library button from the File menu in the top left toolbar.
- The Geometry category is selected by default. If you had another category selected, click on Geometry.
- Click on the cube on the top left. The object will load in the scene.
- Left-click the cube to select it. Click the UP button in the toolbar, between Mesh and Volume.
- Choose Envelope E as the Method selection, enter an Offset value of 5, and click the Make It So button.
- Now your grey mesh cube will materialize into a tangible bronze envelope that has a rounded edge with real depth, as well as a hollow center.
- Envelope is helpful for when you want to use less material in your 3D prints!
Step 4 - Save Progress!
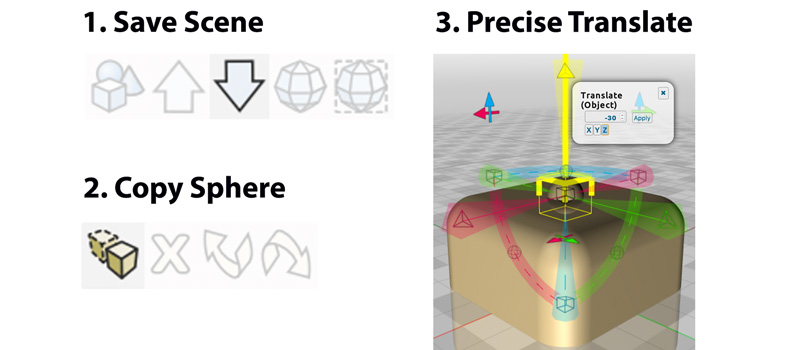
How can I save my progress and prepare to create new shapes?- Simply click Save Scene from the File menu in the top left toolbar, and name your file MeshUP.Dice.Step4.mup.
- Now if you get stuck you will be able to open this file and start over from your saved progress. You are welcome to save again at any point!
- Note that saving the scene as a volumetric MUP file is different than exporting as an OBJ or STL mesh, because it will preserve the volume and envelope information, as well as the position and separate boundaries of multiple objects.
- The opposite sides of a six sided die traditionally add up to seven. We already have one side done, with the sphere correctly positioned in the center of one side.
- Before we begin creating, let’s create a copy of the little sphere since it’s in a size and position that is already in alignment with our cube.
- Click on the sphere, and then click Copy from the Edit menu in the top right toolbar.
- Right-click on the Z axis Gimbal Translate arm ( blue triangle ), and set a Precise value of -30. This will move the copied sphere to the other side of the cube, and will leave the original sphere in place.
- Click the U for Under View in the bottom toolbar to switch the view to bottom of the cube, where we just moved the copy of the sphere.
Step 5 - Subtraction
I saved my progress! How do I start creating?- Excellent! Now we can play with the Subtract tool, which will use the spheres to carve holes out of the cube.
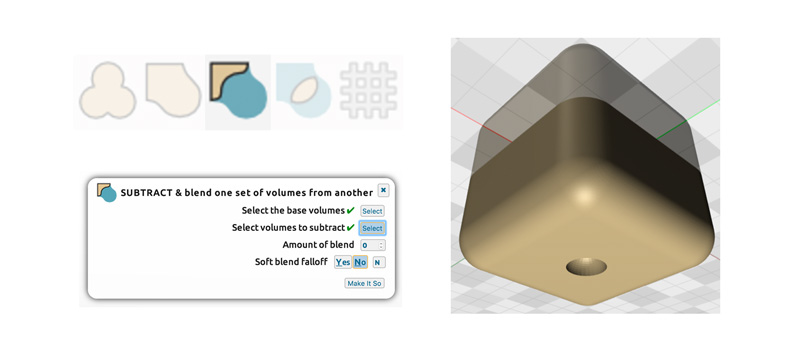
- Select the Subtract tool from the Volume menu in the center top toolbar.
- Click the Select button next to “Select the base volumes”, then click on the cube. This means that the cube is the base volume that will stay in the scene and not be subtracted. There should now be a green checkmark next to the Select button.
- Click the Select button next to “Select volumes to subtract”, then click on the sphere that you moved to the bottom of the cube. This means that the sphere will be subtracted (removed) from the scene. There should now be a green checkmark next to the Select button.
- Leave the other settings like blend (0) and soft falloff (No) with their default values, and click Make It So.
- Now there will be a hole carved out of the bottom center of the cube, making the first side of your die!
Step 6 - Replicate Array
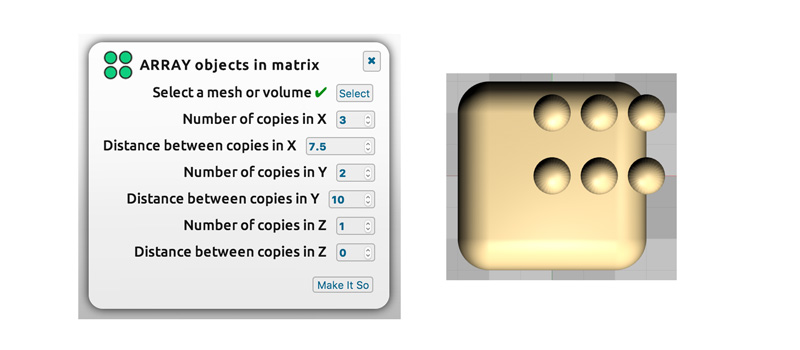
How can Replicate help me copy objects precisely?- Click the A for Above View in the bottom toolbar so you can see the sphere on the top of the cube. Click on the sphere to select it. Click on Replicate Array, in the top toolbar. Enter in these values, and then click Make It So:
- Number of copies in X = 3
- Distance between copies in X = 7.5
- Number of copies in Y = 2
- Distance between copies in Y = 10
- Number of copies in Z = 1
- Distance between copies in Z = 0
- You should now have 6 spheres in perfectly aligned order!
Step 7 - Orthographic View & Multiple Object Subtract
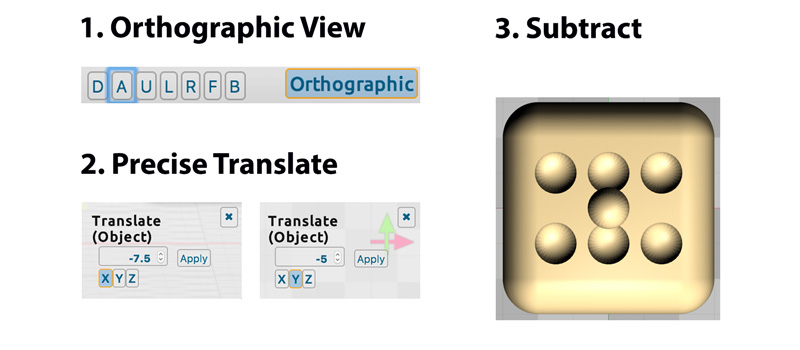
How can an Orthographic view help me move my objects into position during multiple object subtraction?- Click on the Orthographic and U buttons in the bottom right toolbar to switch to a bird’s eye view above the object. This will help align your objects.
- Hold down the shift key, and left-click to select each of the 6 spheres.
- Right-click on the X axis Gimbal Translate arm ( red triangle ), set the Precise value to -7.5, and click Apply.
- Right-click on the Y axis Gimbal Translate arm ( green triangle ), set the Precise value to -5, and click Apply.
- You will now have 6 spheres selected and positioned in the center of the top cube face. You will notice that there is a 7th sphere in the center of the cube. This is the copy left over from the Replicate operation. We will use this in the next step, you may ignore it for now.
- Deselect the spheres by clicking on the grey grid. Click on the Subtract tool in the Volume menu.
- Click the Select button next to “Select the base volumes”, and click on the cube.
- Click the Select button next to “Select volumes to subtract”, and click on one of the six spheres, then hold down the shift button and click on each of the other five spheres. Remember to skip the center 7th sphere!
- Click Make It So, and the six spheres will be subtracted from the cube.
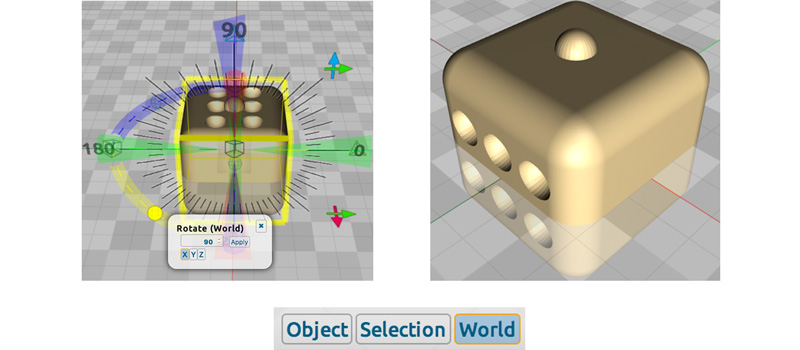
Step 8 - Rotating in World Coordinates
How do I use World Coordinates to precisely rotate my object into position?- Left-click the cube to select the object.
- You may use any View that is convenient to finding the X axis Gimbal Rotate arm, including toggling Orthographic View buttons, and simply click-dragging the grid to pivot the camera around the object.
- Right-click the X axis Gimbal Rotate arm ( red sphere ), enter a Precise value of 90 degrees, and click Apply.
- The cube is now rotated, leaving the remaining sphere copy in the same position as before.
- This will allow us to continue working using the Orthographic & Above View buttons for a clear workspace.
- Left-click the sphere to select the object. Click Copy from the Edit menu in the top toolbar. Click Copy a second time. There will be a total of 3 spheres in the same position.
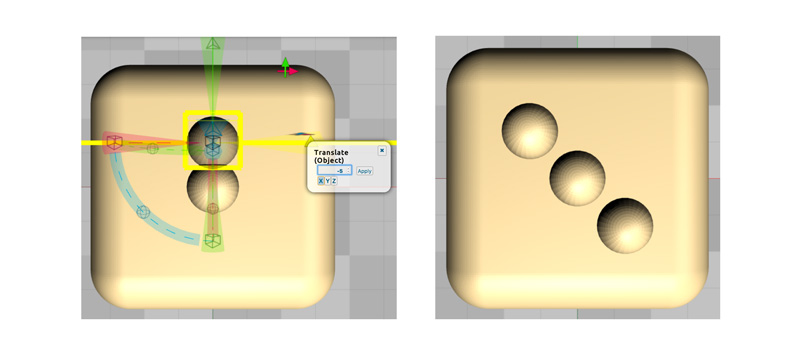
Step 9 - Diagonal Precise Translate & Subtract
How do I position objects precisely along a diagonal?- Left-click a sphere in the center. Right-click the Y axis Gimbal Translate arm ( green triangle ), input a Precise value of 5, and click Apply.
- Right-click the X axis Gimbal Translate arm ( red triangle ), input a Precise value of -5, and click Apply.
- Left-click the other sphere still copied into the center, to select the object.
- Right-click the Y axis Gimbal Translate arm ( green triangle ), input a Precise value of -5, and click Apply.
- Right-click the X axis Gimbal Translate arm ( red triangle ), input a Precise value of 5, and click Apply.
- Click on the top left sphere and then hold down the shift key while left-clicking on the bottom right sphere. Click Copy.
- Click on the grey grid to ensure all objects are deselected, and click on the Subtract tool from the Volume menu.
- Click the Select button next to “Select the base volumes”, and click on the cube.
- Click the Select button next to “Select volumes to subtract”, and click on the top left sphere and then hold down the shift key while left-clicking on the bottom right sphere.
- You will have selected a total of two spheres. Leave the center sphere unselected, and then click Make It So. You will not see the subtraction until the next step.
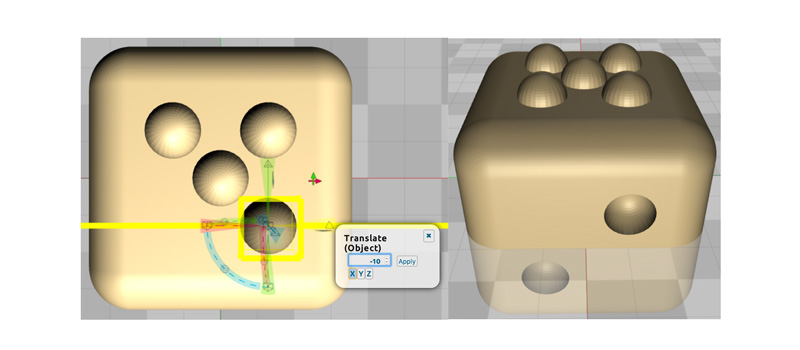
Step 10 - Precise Translate & World Rotate Practice
- You have now created the side of the die with two holes, leaving three extra spheres positioned for continuing the other sides.
- In order to see the face with 2 holes subtracted, we will rotate the cube again. First we will copy the spheres in preparation for the next face.
- Select the top sphere, click Copy, then right-click the X axis Gimbal Translate arm ( red triangle ), enter a Precise value of 10, and click Apply.
- Select the bottom sphere, click Copy, then right-click the X axis Gimbal Translate arm ( red triangle ), enter a Precise value of -10, and click Apply.
- Left-click the cube to select it.
- Right-click the Y axis Gimbal Rotate arm ( green sphere ), enter a Precise value of -90, and click Apply.
- You can now see the side that you subtracted 2 spheres from, and a fresh side is positioned with 5 spheres ready for the next step.

Step 11 - Copy & Subtract Practice
- Click the A for Above View in the bottom toolbar, and make sure the Orthographic button is on (it will be blue instead of light grey).
- Select the center sphere, and hold down the shift key to also select the top left and bottom right spheres, and click Copy. You now have 3 extra spheres.
- Click on the grey grid to ensure all objects are deselected, and then click on the Subtract tool from the Volume menu.
- Click the Select button next to “Select the base volumes”, and click on the cube.
- Click the Select button next to “Select volumes to subtract”, and click on the center sphere, then hold down the shift key while left-clicking the top left and bottom right sphere positions.
- You will have selected a total of 3 spheres. Click Make It So.
- You will now see 5 remaining spheres, ready for the next face. Toggle Orthographic View off so that you can pan the camera around easily in the next step.

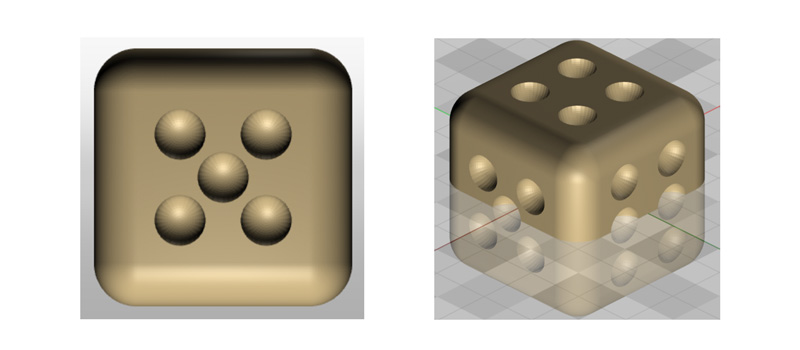
Step 12 - More Practice!
- Left-click the cube to select it, and click on the World Coordinates button in the bottom center toolbar.
- Right-click the Y axis Gimbal Rotate arm ( green sphere ), enter a Precise value of -90, and click Apply.
- You can now see the side that you subtract 3 spheres from, and a fresh side is positioned on top.
- Click back to Object Coordinates again, and click the A for Above View in the bottom toolbar, and feel free to toggle on and off the Orthographic button as it is helpful to you.
- Left-click the top left sphere, and hold down the shift key while also selecting the top right, and bottom two spheres. When you have 4 spheres selected and not the center sphere, click Copy.
- Click on the grey grid to ensure all objects are deselected, and then click on the Subtract tool from the Volume menu.
- Click the Select button next to “Select the base volumes”, and click on the cube.
- Click the Select button next to “Select volumes to subtract”, and click on the center sphere, then hold down the shift key while left-clicking the other 4 sphere positions.
- You will have selected a total of 5 spheres. Click Make It So.
- You will now see 4 remaining spheres, ready for the next face.
Step 13 - Last Face!
- Left-click the cube to select it, and click on the World Coordinates button in the bottom center toolbar.
- Right-click the Y axis Gimbal Rotate arm ( green sphere ), enter a Precise value of -90, and click Apply.
- You can now see the side that you subtracted 5 spheres from, and a fresh side is positioned on top.
- Click back to Object Coordinates again, and click the A for Above View in the bottom toolbar, by the Orthographic button.
- Click on the grey grid to ensure all objects are deselected, and then click on the Subtract tool from the Volume menu.
- Click the Select button next to “Select the base volumes”, and click on the cube.
- Click the Select button next to “Select volumes to subtract”, and click on the top left sphere, then hold down the shift key while left-clicking the other 3 spheres.
- You will have selected a total of 4 spheres. Click Make It So.
- You will now see zero remaining spheres. Congratulations! You have finished the last face.

Step 14 - Save Volumes
How do I save my progress as a volume?- Click the Save button in the File menu
- Enter a name for your file, such as dice.mup
- Choose the folder location you prefer
- Click Save in the folder window
Pro Tip
- Now you can Open your volumetric model any time, and all your hard work making it into a volume will be preserved.

Step 15 - Export a Mesh
Now that I backed up my model as a volume, how do I make an STL, OBJ, or PLY mesh file?- Click the Export button in the File menu, and choose what type of file you want.
- Leave the defaults as is for a watertight mesh. Exporting the mesh as not watertight is of course faster.
- MeshUP will process the volume back into a mesh, and then bring up the window for choosing where to save it.
- Enter a name for your file, such as dice.stl
- Choose the folder location you prefer
- Click Save in the folder window
Pro Tips
- Saving a MUP file is very fast! However, exporting back into mesh can take a few minutes on models with complex geometry. If you are on a mac, and can use more than 1 core, try upping your Core settings in the bottom toolbar drop down menu.
- See our System Requirements if Export takes too long.
- Check out How To Export Mesh walkthrough for more tips on exporting.
- If you want to understand more, try our introduction on Volume vs. Mesh.

Fun Fact
Did you know that dice are an ancient toy?
Like beads, dice have been around for thousands of years!- The Metropolitan Museum of Art has a beautiful collection of dice.
- Check out this cool timeline of the history of dice.
- The oldest gaming tokens are 5,000 years old!
Great work learning how to use more advanced tools in MeshUP! What will you make next?